Overview
-
Create users
-
a) Create users manually
-
b) Import multiple users via Excel file
-
c) Synchronize users via an HR or identity system
-
d) Allow users to self-register
-
-
Invite users
1. Create users
There are several ways to create users and profile information in Lemontaps, which are described below.
If certain information should be identical across all profiles or only for specific user groups (e.g. addresses), we recommend defining standard values in advance. You can find more information here.
a) Create users manually
Create individual users manually
-
Open User Management → All user profiles section in the Admin View
-
Click "Add user" in the top right
-
Enter first name, last name, and email address
Select the account language, role, and optionally assign the user to a unit
(more information about units can be found here) -
Optionally, decide whether the invitation should be sent immediately
-
Click Save
The user will then appear in the user list.
b) Import users via Excel file
Instead of creating users individually, you can use the Excel importer.
Upload an Excel file to automatically create users and their associated profile information.
You can find more details in the article:
→ Create Users & Profiles via Excel Import
c) Synchronize users via an HR or identity system
You can manage users automatically via an integration, for example using SCIM or Microsoft Entra ID.
Users and user information are created automatically, and any subsequent changes are synchronized.
Updates in the source system are automatically reflected in Lemontaps.
More information can be found in the article:
→ SCIM User Provisioning Set up
d) Allow users to self-register
Users can also register independently using their business email address without being created manually in advance.
To ensure these users are automatically assigned to your organization, you can use the following options:
-
Enable Single Sign-On (SSO)
Users sign in with their existing company credentials and are directly assigned to your team. -
Enable Account Claiming
By verifying your email domain, self-registered users with this domain are automatically added to your team.
More information can be found here :
→ Set up Single Sign-On (SSO)
→ Account Claiming
2. Invite or re-invite users
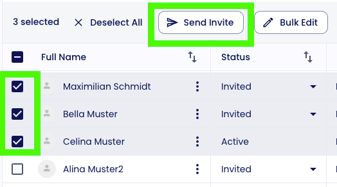
-
Select one or more users in the user list using the checkboxes
-
Click "Send invitation(s)"
- The invitation email will be sent to the selected users. The email contains a link to set a password, which the users can use to log in. The link is valid for 7 days.
If Single Sign-On (SSO) is enabled, the invitation email should also include the corresponding login link.
You can resend invitations at any time as long as they have not yet been accepted. Invitations cannot be withdrawn.
Further information can be found here:
→ Customize invitation email