---
title: How do I create and manage Event Units?
description: This article explains step by step how events in Event Units work, how to create and manage them, and how to link them with contacts and members.
---
[Skip to content](https://support.lemontaps.com/en/how-do-i-create-and-manage-event-units#main-content)
- [English](https://support.lemontaps.com/en/how-do-i-create-and-manage-event-units)
- [Deutsch](https://support.lemontaps.com/de/wie-erstelle-und-verwalte-ich-units-in-lemontaps-0)
English
Show submenu for translations
.svg)
- Start
- Produkte
- Preise
- Blog
- Unternehmen
Open main navigation
Close main navigation
- Start
- Produkte
- Preise
- Blog
- Unternehmen
- - [English](https://support.lemontaps.com/en/how-do-i-create-and-manage-event-units)
- [Deutsch](https://support.lemontaps.com/de/wie-erstelle-und-verwalte-ich-units-in-lemontaps-0)
English
Show submenu for translations
- [Contact us](mailto:support@lemontaps.com)
[Contact us](mailto:support@lemontaps.com)
How can we help you?
- There are no suggestions because the search field is empty.
1. [Lemontaps Helpdesk](https://support.lemontaps.com/en?hsLang=en)
2. [Lead capture](https://support.lemontaps.com/en/lead-capture?hsLang=en)
September 30, 2026
# How do I create and manage Event Units?
**Note:** The management of Event Units is only available for administrators who have booked the **Sales Add-on**.
With Event Units, you can manage leads, members, forms, follow-up emails and insights specifically for individual events. This allows trade shows, conferences or campaigns to be clearly separated from one another – including their own processes and individual settings.
---
### 1. Creating and Assigning Event Units in Lemontaps:
##### **Step 1: Create Units**
- Navigate to [Contacts → Events](https://lemontaps.com/md/events).
- Click on “Add Event” to create a new event.
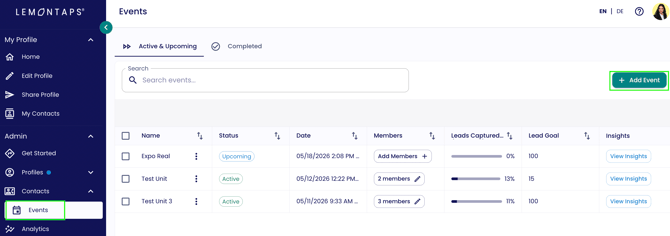
- A popup window for event creation will open.
---
**Step 2: Add Event Details**
The following information can be entered:
- Event Name
- Estimated Total Costs
- Start Date + Time
- End Date + Time
- Lead Goal
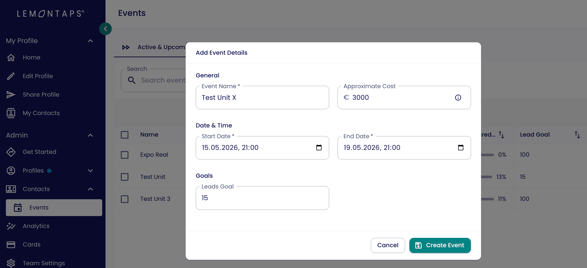
- Click on “Create Event”.
**Event – Overview:**
- After creating the event, you will be redirected to the Event Overview page. There you will find the two tabs: Active & Upcoming, Completed.
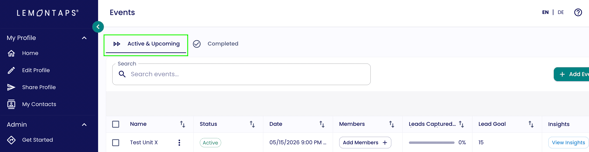
The status of an event is automatically determined based on the start and end date:
| **Status** | **Description** |
| --- | --- |
| Upcoming | Start date is in the future |
| Active | Start date ≤ today ≤ end date |
| Completed | End date is in the past |
The Event Table contains the following information:
- Event Name
- Status
- Date (Start & End Date)
- Number of Members
- Captured Leads
- Lead Goal
- Insights
---
**Event Detail Page:**
Click on the name of the unit on the left side to open the Event Detail View.
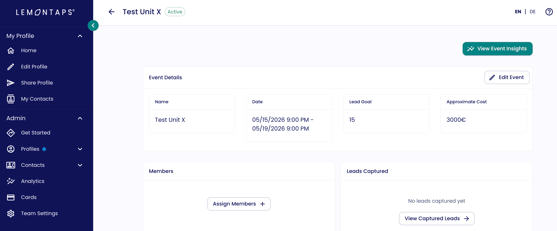
In the detail view, you can:
- Edit the event
- Assign and manage members
- View captured leads
- Configure the event contact form
- Configure event follow-up emails
- View event insights
---
**Step 3: Add Members to an Event**
- Click on “Assign Members”.
- A popup window will open.
You can:
- Select individual members
- Select multiple members at once
- Select all members
- Search for members in the search bar
- Filter members by units
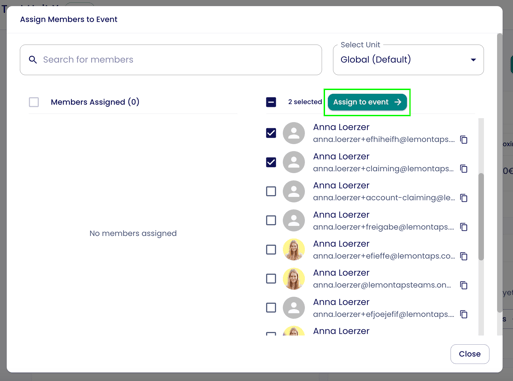
- Then click on “Assign to Event”.
- The selected members will be added to the event.
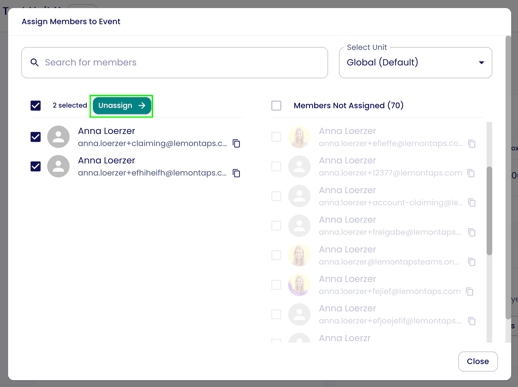
**Remove Members**
- Members can be removed at any time.
- After removal, they will automatically appear again in the list of available members.
***Important Notes:***
- A contact can be assigned to multiple events.
- If multiple active events exist, the alphabetically first event will be used as the default event.
- Only visible members can be selected.
- If members are hidden by search or filters, they will automatically be deselected.
---
### **2. Captured Leads of an Event**
**View Leads**
- The number of leads is clickable. Click on “View Captured Leads”.
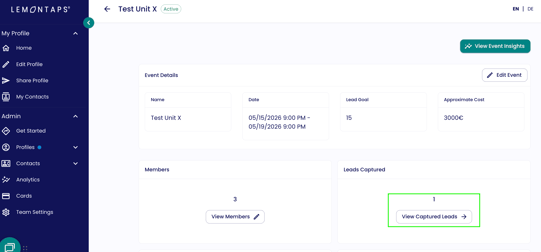
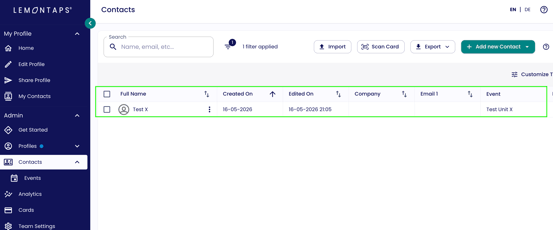
- When opened, a filtered contact view will be displayed.
- Only leads from this event will be shown.
- In the contacts section, there is also an additional column called “Event”. This column shows through which event the contact was captured.
****
**Automatic Assignment**
If a user:
- is assigned to an active event
- and creates a new contact
→ the lead will automatically be assigned to the event.
**Important Condition**
Automatic assignment only works for:
- active events
Not for:
- upcoming events
- completed events
**Lead Goals and Progress**
Each event can have a lead goal.
**Example**
| **Goal** | **Captured Leads** | **Progress** |
| --- | --- | --- |
| 100 | 20 | 20% |
- The progress is calculated automatically and displayed as a progress bar.
---
### **3. Event-Specific Contact Forms**
- Each event can have its own contact form. This allows different information to be collected for different events.
- You can create both an internal and an external form.
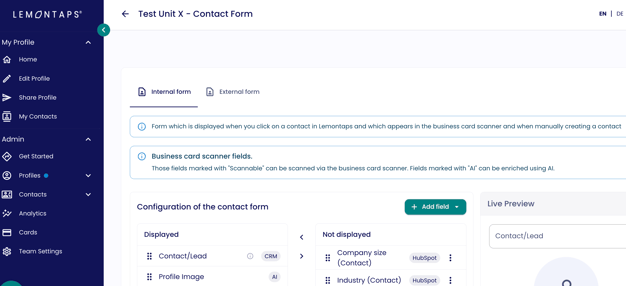
Once an event form is configured:
- it overrides the default form
- but only during the active event period
- and only for members assigned to this event
- “Custom Fields” will be displayed in the Event Insights
If no custom event form is defined or the event form is deleted, the user’s default form will automatically be used.
→ Learn more about the Internal and External Contact Form [here](https://support.lemontaps.com/en/how-do-i-change-the-internal-and-external-contact-form?hsLang=en).
---
### **4. Event-Specific Follow-up Emails**
- Each event can use its own follow-up email. This allows different follow-up emails to be created for different events.
- You can also set up follow-up emails in multiple languages.
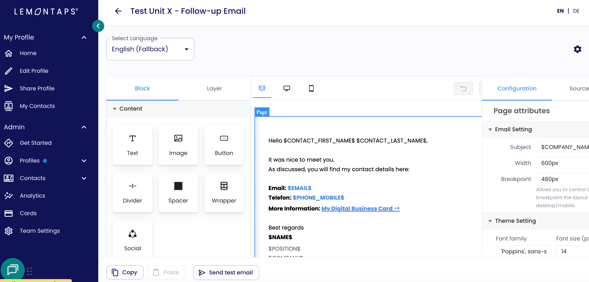
Once a follow-up email is configured:
- it overrides the default follow-up email
- but only during the active event period
- and only for members assigned to this event
If no custom follow-up email is configured or the follow-up email is deleted, the user’s default follow-up email will automatically be used.
→ Learn more about setting up follow-up emails [here](https://support.lemontaps.com/en/follow-up-email-to-contacts?hsLang=en).
---
### **5. Edit, Duplicate & Delete Events**
Each event can be managed via the three-dot menu in the Event Overview.
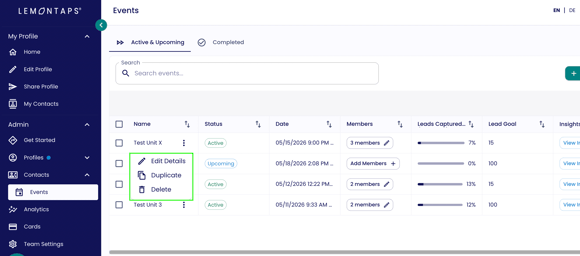
**Duplicate Event:**
When you click on “Duplicate”, a new event with prefilled data will be created.
The following data will be copied:
- Event details
- Contact forms
- Follow-up settings
- Goals
**Important:** The event name must be changed before saving, because each event name can only exist once.
**Delete Event:**
When you click on “Delete”, the event will be deleted.
| Deleted: | Not Deleted |
| --- | --- |
| - Event Settings - Event Assignments - Event Forms - Event Emails | - Contacts - Leads - Contact Data |
→ Contacts remain fully available in the contact system.
---
### 6. Event-Insights
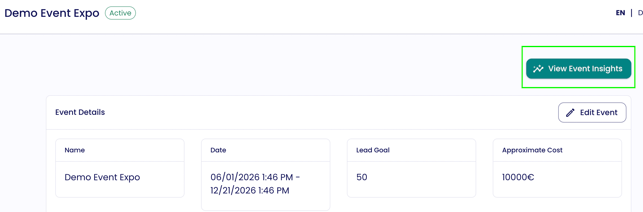
The Event Insights section provides a detailed overview of your event performance, lead generation, and attendee interactions. All analytics are automatically generated based on event data and the activities of assigned team members.
- To access the Event Insights, click "Show Event Insights".
---
#### Overall Event Performance
At the top of the Insights page, you will find the most important event metrics:
- Generated Pipeline
- Event Costs
- Team Members
- Total Leads
- Lead Goal Progress
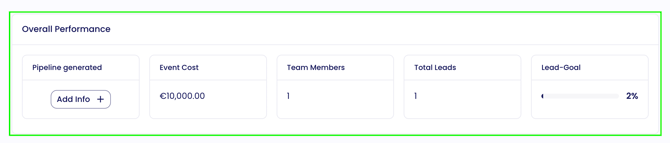
These metrics provide a quick overview of the overall performance of your event.
---
#### Generated Pipeline
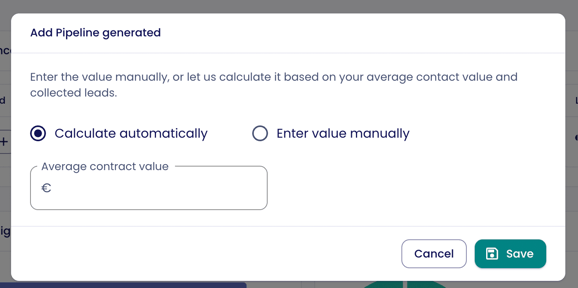
The Generated Pipeline section allows you to track the estimated revenue value of the collected leads.
You can choose between two calculation methods:
- Calculate automatically
- Enter value manually
Additionally, you can define an average contract value.
##### 
##### Automatic Calculation
With automatic calculation, the pipeline is calculated based on:
- Average contract value
- Number of collected leads
Example:
Average Contract Value × Total Leads = Generated Pipeline
If a new event does not yet contain any leads, no value is displayed initially and the message "Add information" may appear.
Since no leads are available in this case, the automatic calculation results in a value of **0**.
##### Manual Calculation
Alternatively, you can manually enter the pipeline value.
This is useful when:
- Revenue values are managed externally
- Estimated revenue should be adjusted manually
- No automatic calculation data is available yet
Once manual mode is activated, the entered value is used directly for the Event Insights.
---
#### Business Card Insights
The Business Card Insights show how often digital business cards were used and viewed during the event.
The following metrics are displayed:
- Profile Views
- Link Clicks
- File Clicks
- Saved vCards
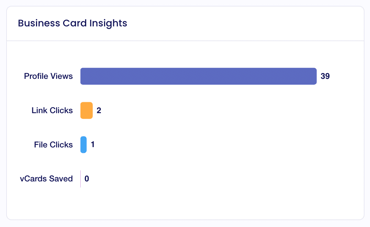
These insights help you evaluate your team's engagement and reach during the event.
---
#### Lead Sources
TheLead Sources section shows through which channels leads were captured.
The following lead sources are available:
- Business Card
- Leads created by scanning business cards.
- Badge Scan
- Leads captured by scanning attendee badges.
- Lead Capture Form
- Leads generated through internal or external lead capture forms.
- QR Code Scan
- Leads collected through public QR code forms.
- Manuell
- Manually created contacts
- Contacts from the contact management system
- CRM imports
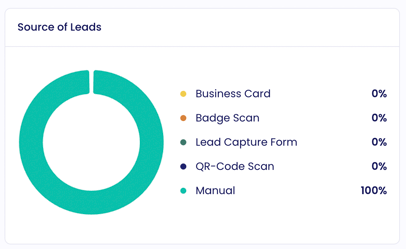
The percentage distribution is automatically calculated based on all collected leads.
---
#### Leads per Day
The Leads per Day section shows how many leads were captured on each event day.
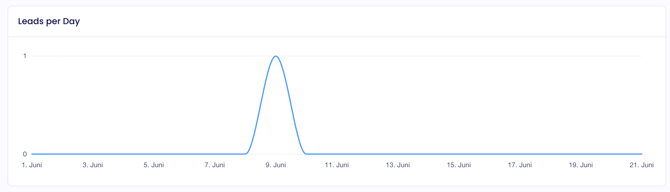
This allows you to identify the days on which the highest number of leads was generated.
---
#### Leads by Hour and Day
The Leads by Hour and Day view provides a detailed heatmap of lead activity throughout the event.
It shows:
- Which day generated the most leads
- The times of day with the highest activity
- The strongest event periods
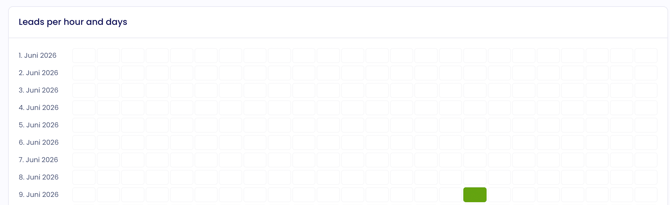
The overview is displayed hourly throughout the day and helps identify peak times and the most successful event periods.
---
#### Custom Field Insights
- Custom fields from the internal contact form are automatically included and analyzed within the Event Insights.
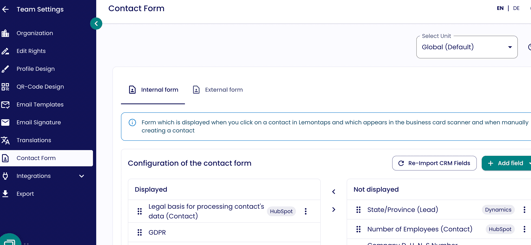
- All submitted responses are collected and displayed within the analytics.
- This allows you to better analyze participant interests, qualification data, and event-related information.
Example custom fields:
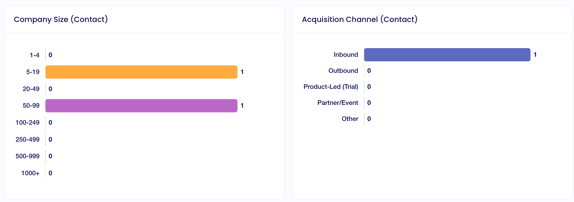
This enables you to identify which products, services, or topics generated the greatest interest during the event.
---
### 7. Exporting Event Insights
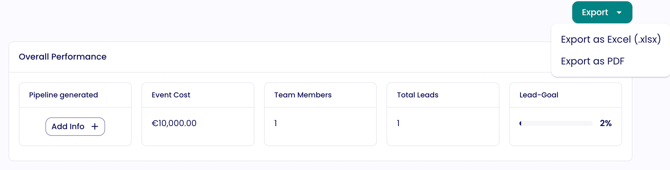
Event Insights can be exported as both PDF and Excel files.
The following export formats are available:
- PDF Export
- Excel Export
---
### PDF-Export
The PDF export includes all Event Insights content in a PDF document.
This includes:
- Overall Performance
- Business Card Insights
- Lead Sources
- Leads per Day
- Leads by Hour and Day
- Custom Field Analyses
The PDF closely reflects the appearance of the platform.
---
### Excel-Export
The Excel export generates a structured event report.
The Excel file contains various sections and analyses, including:
- Overall Performance
- Business Card Insights
- Lead Sources
- Leads per Day
- Leads by Hour and Day
- Custom Field Analyses
---
##### Multilingual Export
- Export files are automatically generated in the selected language.
- For example, if German is selected:
- The PDF file is exported in German.
- The Excel file is also fully generated in German.
- The same applies to all other supported languages.
---
### **FAQs**
**How do I assign contacts added later to the correct event day?**
If you add a contact at a later time, for example, the day after the conversation, you can specify the actual capture date using the Lemontaps standard field“Captured at.” Event Insights will assign the lead to this date rather than the date on which the contact was added.
Follow these steps:
1. In the event contact form, go to Add field → Lemontaps standard fields and add the “Captured at” field.
2. Create the contact or open an existing contact.
3. In the “Captured at” field, select the date and time when the contact was actually captured.
4. Save the contact.
In[Event Insights](https://lemontaps.com/md/events/2542/report), the lead will then appear in the timeline chart on the selected day. In the “Leads by hour and day” overview, it will appear in the selected hourly time slot.
In the contact overview, you can see the selected date in the “Created at” column. The “Edited at” column shows when the contact was last modified.
- [Central User Management](https://support.lemontaps.com/en/central-user-management?hsLang=en#main-content)
- [User Management](https://support.lemontaps.com/en/central-user-management?hsLang=en#user-management)
- [Email & Communication](https://support.lemontaps.com/en/central-user-management?hsLang=en#email-communication)
- [Roles, Permissions & Approvals](https://support.lemontaps.com/en/central-user-management?hsLang=en#roles-permissions-approvals)
- [Manage Profile Content](https://support.lemontaps.com/en/central-user-management?hsLang=en#manage-profile-content)
- [Bulk Management & Imports](https://support.lemontaps.com/en/central-user-management?hsLang=en#bulk-management-imports)
- [Organization & structure](https://support.lemontaps.com/en/central-user-management?hsLang=en#organization-structure)
- [White-Label](https://support.lemontaps.com/en/central-user-management?hsLang=en#white-label)
- [Identity & Security](https://support.lemontaps.com/en/central-user-management?hsLang=en#identity-security)
- [Integrations](https://support.lemontaps.com/en/integrations?hsLang=en#main-content)
- [Identity & User Management](https://support.lemontaps.com/en/integrations?hsLang=en#identity-user-management)
- [CRM Integrations](https://support.lemontaps.com/en/integrations?hsLang=en#crm-integrations)
- [Other Integrations](https://support.lemontaps.com/en/integrations?hsLang=en#other-integrations)
- [Digital Business Card](https://support.lemontaps.com/en/digital-business-card?hsLang=en#main-content)
- [Share Digital Business Card](https://support.lemontaps.com/en/digital-business-card?hsLang=en#share-digital-business-card)
- [Design & Layout](https://support.lemontaps.com/en/digital-business-card?hsLang=en#design-layout)
- [NFC card](https://support.lemontaps.com/en/digital-business-card?hsLang=en#nfc-card)
- [Lead capture](https://support.lemontaps.com/en/lead-capture?hsLang=en)
- [Email signature](https://support.lemontaps.com/en/email-signature?hsLang=en#main-content)
- [Centralized email signatures (Outlook)](https://support.lemontaps.com/en/email-signature?hsLang=en#centralized-email-signatures-outlook)
- [Manual email signatures](https://support.lemontaps.com/en/email-signature?hsLang=en#manual-email-signatures)
- [Email signature design](https://support.lemontaps.com/en/email-signature?hsLang=en#email-signature-design)
- [Paper business card ordering system](https://support.lemontaps.com/en/paper-business-card-ordering-system?hsLang=en)
- [Legal & Data Protection](https://support.lemontaps.com/en/legal-data-protection?hsLang=en)
- [Troubleshooting & Problem Resolution](https://support.lemontaps.com/en/troubleshooting-problem-resolution?hsLang=en#main-content)
- [Login & Access Issues](https://support.lemontaps.com/en/troubleshooting-problem-resolution?hsLang=en#login-access-issues)
- [Email signature – issues](https://support.lemontaps.com/en/troubleshooting-problem-resolution?hsLang=en#email-signature-issues)
- [Technical Diagnostics](https://support.lemontaps.com/en/troubleshooting-problem-resolution?hsLang=en#technical-diagnostics)
- [Feature & Function Issues](https://support.lemontaps.com/en/troubleshooting-problem-resolution?hsLang=en#feature-function-issues)
- [Paper Card Ordering System – Issues](https://support.lemontaps.com/en/troubleshooting-problem-resolution?hsLang=en#paper-card-ordering-system-issues)
- [NFC & Hardware – Issues](https://support.lemontaps.com/en/troubleshooting-problem-resolution?hsLang=en#nfc-hardware-issues)
- [SCIM problems](https://support.lemontaps.com/en/troubleshooting-problem-resolution?hsLang=en#scim-problems)
- [Account & Security](https://support.lemontaps.com/en/account-security?hsLang=en#main-content)
- [Account Settings](https://support.lemontaps.com/en/account-security?hsLang=en#account-settings)
- [Billing & Subscription](https://support.lemontaps.com/en/billing-subscription?hsLang=en#main-content)
- [Trial Period & Plans](https://support.lemontaps.com/en/billing-subscription?hsLang=en#trial-period-plans)
- [Invoices & Payments](https://support.lemontaps.com/en/billing-subscription?hsLang=en#invoices-payments)
- [Licenses & Cancellation](https://support.lemontaps.com/en/billing-subscription?hsLang=en#licenses-cancellation)
# Lemon Innovation & Technology GmbH
[mailto:support@lemontaps.com](mailto:support@lemontaps.com)
Copyright © 2026, Lemon Innovation & Technology GmbH