TABLE OF CONTENTS
- 1. Requirements
- 2. Overview of the integration
- 3. Linking Lemontaps with CRM
- 4. Settings in Lemontaps
- 5. FAQs
1. Requirements
You must have administrator rights to set up the link.
2. Overview of the integration
With the CRM integration, either only administrators or also end users can push the contacts recorded with Lemontaps to CRM as leads or contacts either automatically or manually. This works for both the mobile version and the desktop version.
User Journey:
- Case 1 - Manual push: If you have set the “manual push”, you select the contacts to be exported in the contact overview of the admins as well as in the end user contact overview using the checkboxes and then click on CRM. The export is then started.
Case 2 - Automatic push: If you have selected “automatic push” in the settings, the push to CRM is started automatically for every new contact. Previous contacts are not pushed automatically. If you want to have the previously recorded contacts in the CRM as well, you would have to push them once.

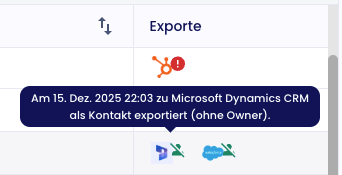
- Status of the export: In the contact table, you can see the status in the “Export” column. If you click on the symbol, you can see further information, e.g. when the export took place. If there is an exclamation mark behind the CRM symbol, you can see that the export has failed. If you manually push the contacts, you will also always receive an email with the number of contacts for which the export worked/failed.


Note:
- With automatic synchronization, it is sometimes necessary to refresh the page to see the corresponding icon if, for example, a new contact has been created.
- Updates to contacts in Lemontaps are not automatically updated in CRM.
The following attributes are transferred:
| Predefined fields in Lemontaps | contact | Lead |
| Notes | Yes | No |
| First name | Yes | Yes |
| Last name | Yes | Yes |
| Position | Yes | Yes |
| Role | No | No |
| Department | No | No |
| Company | Yes, in the notes field | Yes |
| No | No | |
| Email work | Yes | Yes |
| Phone work | Yes | Yes |
| Phone Mobile | Yes | Yes |
| Fax | Yes | Yes |
| Website | No | Yes |
| Addressee | No | No |
| Address line 1 | Yes | Yes |
| Address line 2 | No | No |
| Zip code | Yes | Yes |
| City | Yes | Yes |
| Country | Yes (only if the country is written as a country code, e.g. DE) | Yes (only if the country is written as a country code, e.g. DE) |
| Owner | is created as “Contact Owner” if the Lemontaps user's account email is also a CRM user. If the Lemontaps user's account email is not a CRM user, the CRM user who set up the Lemontaps - CRM integration is used as the owner. | Is created as “Lead Owner” if the Lemontaps user's account email is also a CRM user. If the Lemontaps user's account email is not a CRM user, the CRM user who set up the Lemontaps - CRM Integration is used as the owner. |
| Stage | - | Automatically into the first stage |
| Profile picture | Yes (appears under “Timeline” and as profile picture) | Yes (appears under “Timeline” and as profile picture) |
| Paper business card image | Yes (appears under “Timeline”) | Yes (appears under “Timeline”) |
| File attachments | Yes (appears under “Timeline”) | Yes (appears under “Timeline”) |
| Met on | Yes | Yes |
Lead source: Yes (notes) | Lead source: No |
Custom fields:
If you have created custom fields directly in Dynamics, you can also make them visible in the Lemontaps lead form.
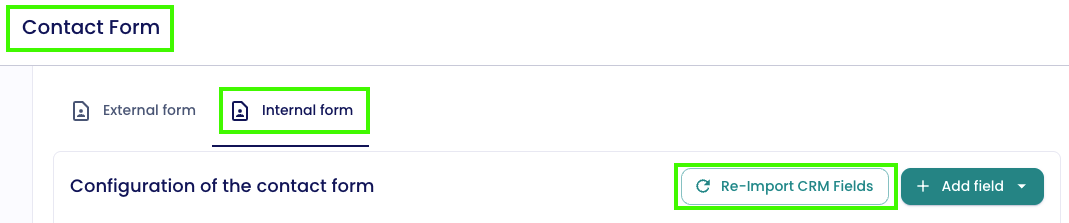
- Navigate to Contact Form → Internal Contact Form.
- Click on “Re-import CRM fields”.
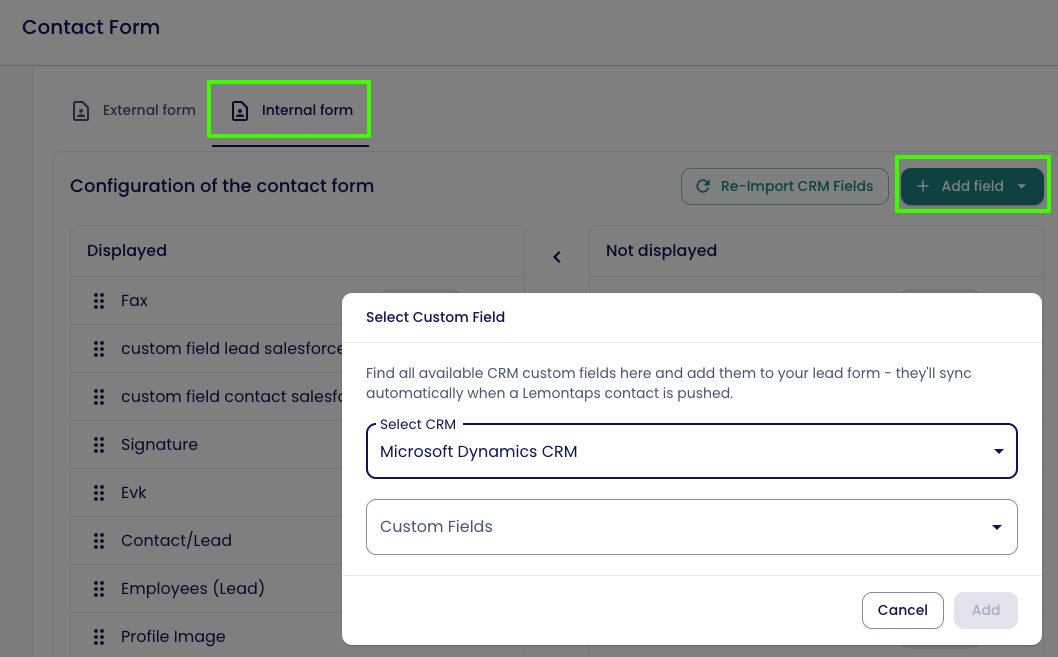
- Then click on “Add field” → “CRM Custom Field” and select the custom field you want to add.
The custom fields from Dynamics will then be displayed in Lemontaps.
When you fill in these custom fields in the Lemontaps lead form and export the contact to Dynamics, the corresponding fields in Dynamics will be populated correctly.
Duplicates:
If there is already a contact/lead in CRM with the same email address as the contact to be pushed from Lemontaps to CRM, then the export will not work as duplicates are prevented. In this case, the reason is also displayed in the export column. In the case of a manual push, you will also receive an email as to whether there were duplicates during the export.

3. Linking Lemontaps with Microsoft Dynamics CRM
Step 1: Open CRM integration in Lemontaps
- Navigate to Team settings > Integration > CRM
- A Microsoft Dynamics CRM popup will now open
- Here you must now insert the organization URL (continue with step 2)

Step 2: Organization URL from Dynamics365
- Open the Dynamics365 page and log in via the following link: https://login.microsoftonline.com/
- Now copy the URL up to ".com" (marked green in the screenshot)

Step 3: Enter the organization URL
- Now paste the organization URL into the field

- Now click on "Save" and then on "Authorize Microsoft Dynamics CRM"

- Note: a pop-up will open, but this is not relevant for you
- You are now connected to the CRM

Step 4: Check successful configuration
- Navigate again to Team Settings > Integration > CRM
- The "General CRM integration settings" now appear at the top
- Further down you will see the item "Manage your CRM integration"
- Microsoft Dynamics CRM button appears in GREEN if the configuration was successful, in orange if the configuration was incorrect (try again)

- Click on the button and then on the three dots to edit or delete the configuration

4. Settings in Lemontaps
You have the following setting options in Lemontaps:
- Automatic or manual export to Microsoft Dynamics
- Should contacts be created as leads or as contacts in Microsoft Dynamics or do you want to leave it up to the user?
Rights: Are individual users also allowed to transfer contacts to Microsoft Dynamics or only admins?
You can set the first 2 points here and the editing rights here.


If you select the 3rd option Allow users to choose between ‘Contact’ and ‘Lead’, then navigate to the internal form and move the ‘Contact/Lead’ field to ‘Show’.

Exporting contacts to a CRM system
When exporting a contact, e.g. to Microsoft Dynamics, a selection option now appears.
The user must specify whether the contact is exported as a lead or as a contact.


After the export, the selected option is displayed in the system.

Automatic assignment when creating a contact
If the selection was already made when the contact was created in Lemontaps, there is no need to ask again when exporting.


The assignment is then made automatically.


The ability to specify the export option when creating a contact makes the process more efficient and transparent.
5. FAQs
My export has failed, what could be the reasons for this?
Note: If an export fails, an error message will be displayed. You can view the details by going to Contacts and clicking the small icon in the Exports column.
Note: Leads/contacts can be exported even if they are empty.
While it is possible to define custom fields as required, Dynamics does not enforce these required fields during creation. This means leads/contacts can still be created and exported without those fields being filled in.
1) Duplicate:
- The email address of the contact in Lemontaps already exists in CRM for a lead or for a contact.
2) Refresh:
- With automatic synchronization, it is sometimes necessary to refresh the page to see the corresponding icon if, for example, a new contact has been created.
- Updates to contacts in Lemontaps are not automatically updated in CRM.
3) Other reasons:
- It may still not work. Try exporting the contact again. If it still does not work, please contact support@lemontaps.com.
What happens to duplicate entries?
The export stops as soon as a duplicate email address is indexed. No new contact will be added in the CRM. Therefore, the current contact won't be updated.
Can duplicates be updated?
No, duplicates won't be updated in the CRM. The Lemontaps contact won't get exported – The action fails.
Is the integration GDPR compliant?
Yes, it is. You can find more information here.
How do I handle required fields in Dynamics?
If you have defined required fields in Dynamics, they will automatically appear in the setup popup.
You have several options:
1. Same values for all leads/contacts
Enter the desired values directly in the popup – they will then be applied to all contacts.
2. Do not transfer required fields
Simply leave the fields empty; the export to Dynamics will still work. If you have already selected an attribute in a dropdown within the popup, you can’t delete it individually – in that case, delete the entire Dynamics connection once and set it up again.
3. Collect required fields individually in the lead capture form
If required fields are important for you, you can add them directly to the Lemontaps lead capture form.
Navigate to Contact Form → Internal Contact Form.
Click on “Re-import CRM fields”.
Then click on “Add field” → “CRM Custom Field” and select the custom field you want to add.
This ensures that your colleagues fill in the required fields right when capturing a contact.
Was this article helpful?
That’s Great!
Thank you for your feedback
Sorry! We couldn't be helpful
Thank you for your feedback
Feedback sent
We appreciate your effort and will try to fix the article